The Tractor Monoplane "Ad Astra"
|
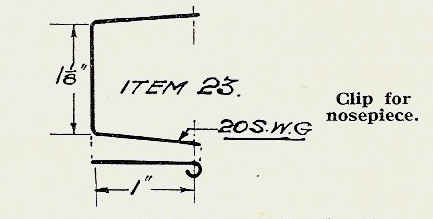
Undercarriage.
This component is made up with four legs or struts, bent to required shape, from lengths given in schedule, Axle is of 16 s.w.g , and wheels 3 in. dia. The top ends of struts are bent to form prongs which are housed in the tubes illustrated in item 3. The front ones should each be 7/8 in. long and rear ones each 1⅜ in. long. The feet or prongs bound and soldered to axle need only be ½ in. long. If bent to above measurements the position of wheels automatically comes correct. The wheels can be made up from ⅛ in. 3-ply, but is really cheaper to buy them. It is best to rig up undercarriage in place on the fuselage, after binding feet in position. Any trueing up can then be done before soldering. The rear motor hooks, item 15,can either be bent up from 16 s.w.g. piano wire or soft tinned iron. Bend from the centre first, and make the hooks last. The wire nose clip can be made up, but not bolted in position until fuselage is covered and doped. Covering Components. Fuselage. Tear two strips of silk, one 31 in. by 3 in., the other 31 in. by 10 in. Damp the narrow piece with water, and spread it evenly over the bottom of fuselage. Glue through the silk over the bottom edge of No. I and 2 formers, rubbing glue In with fingers, to ensure adhesion. Allow 20 minutes to set, then glue silk to bottom stern former, drawing the silk taut along its length. Now run glue along bottom edges and sides of each longeron, and press silk gently over, keeping the threads in the silk straight lengthwise. Finish glueing on top edge of bottom longeron. When dry trim off odd ends. The top and sides are covered in one piece 10 in, wide. Damp it with warm water, and spread it evenly over the top longerons. Glue at each end of fuselage as in fixing the bottom piece, then run glue along sides and top edges of longerons through the silk. Pull the silk over gently and evenly with fingers and palm of hand, keeping it taut both ways. Allow ¾ hour to set. Now glue outer side of, say, left bottom longeron, still keeping silk on this side damp. Bring silk over the side of longeron, keeping the threads of silk vertical, and finish at the bottom side and not underneath. A hot damp cloth will assist in keeping the glue liquid if rubbed lightly over the glued silk at intervals, but do not apply it too often, or too wet, as it may unstick the silk underneath. Now glue silk at No, 1 and 2 formers, and finally on the side of, and round, vertical side struts at rear of fuselage. The covering finishes here, as the space between strut and stern post each side must be left open to get at rear hooks for fixing rubber motor. Carry on in the same way, glueing the opposite side. Finally glue through the silk to the edges of formers on all four sides, thus the silk acts as bracing between the bays formed by the components, making the whole structure rigid. When dry trim off all surplus silk with a discarded razor blade. 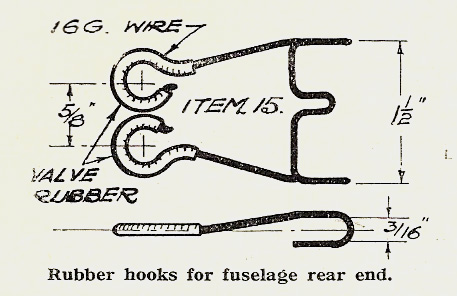
|
'CLICK' on above picture to enlarge
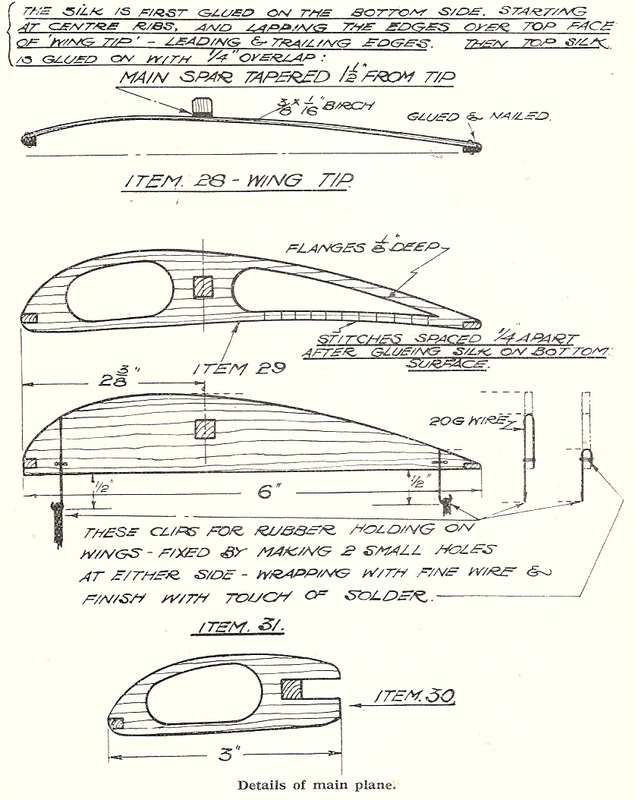
Main Plane or Wing. Tear two strips of silk, one 40 in. by 6½ in., the other 40 in. by 7 in., the former to cover the bottom side, and the latter for top side. Damp piece for underside, and glue one edge to the bottom surface of trailing edge, allowing ⅜ in. overlap. Assistance is needed to pull the silk taut lengthwise along trailing edge, at the same time with finger press the silk on to wood, working from centre outward both sides. Make sure that overlap is equal the whole length of wing, and that ½ in. extends each end. Allow ¾ hour to set, then glue top surface of trailing edge, and gently press overlap round over top surface. When quite dry, perform a similar operation with silk round leading edge, keeping silk damp and threads in silk straight. This damping with warm water causes threads in silk to swell by absorbing the moisture, and as it dries out the silk contracts. Do not stretch silk too much or framework may become distorted when doped. When glue is dry damp silk at tips. Cut silk at each end, allowing ⅜ in. overlap. Glue tips and fix silk in position, pulling slightly to tighten. Owing to the underside of the ribs towards the trailing edge being hollow it is necessary to stitch silk to the flanges as in item 29. Fixing silk to top side of plane is a little more difficult. First run a little glue over the bottom face of leading edge, after damping silk, and preferably with assistance. Glue one edge of silk about ¼ in. over the surface, the whole length. Keep silk taut lengthwise, and have the edge pressed down, working from centre outwards. Allow glue to dry, then glue silk to top edges of centre ribs, bringing it over tight, and finishing with glueing on under surface of trailing edge, between the centre ribs, with ¼ in. overlap. Rub glue well in through the silk on to the ribs, and keep it taut both ways. Allow glue to set hard, preferably 12 hours. Silk can now be glued to underside at tips, allowing ¼ in. to overlap. While doing this keep silk taut both lengthwise and across the wing, the latter, of course, at the tip. If it is not kept taut, especially from the leading edge to 3 in. back, the silk will fall hollow between the ribs, and the efficiency of the wing thereby reduced. Finally trim the loose edge off, allowing ¼ in. overlap beyond trailing edge. Glue under surface of trailing edge, and, with thumb and finger working from the centre, gently fold silk into place. Do not pull tight, especially between the ribs. An old safety razor blade, aforementioned, is an excellent instrument for trimming off ends and edges, for one can get in places with this where one cannot with chisel or scissors. |
